The Reverse Outline: How to Untangle a Messy Plot
Most writers outline before they draft. Fewer think to outline after.
But if your novel feels tangled, plot threads going nowhere, scenes that “work” but don’t seem to do anything, a middle that drags despite good prose, the problem often isn’t your writing skill. It’s that you no longer have a clear view of what your story is actually doing.
That’s where the reverse outline comes in.
A reverse outline is one of the simplest, most revealing tools during revisions. It doesn’t ask what you meant to write or what your original outline said should happen. It asks one brutal, clarifying question:
What actually happens on the page?
What Is a Reverse Outline?
A reverse outline is created after you’ve finished a draft. Instead of planning forward, you look backward. Scene by scene, chapter by chapter, you write down what occurs in your manuscript; not the intention, not the theme, not the emotional hope, but the concrete events and changes.
At its simplest, each entry answers three questions:
- What happens in this scene?
- Who drives the action?
- What changes by the end?
No analysis yet. The power comes from seeing those facts laid out all at once, stripping away the noise of the prose to reveal the skeleton of the story.
Why it Works
When you’re deep inside a draft, your brain fills in gaps automatically. You know what the story is supposed to be about, so you subconsciously credit the manuscript for things that aren’t fully there. You might read a scene and feel the tension because you know the character is scared, even if you haven't actually written that fear onto the page. And you might picture the atmospheric monastary with burning incense and flickering shadows, but all your readers see is Times New Roman.
Every scene in your manuscript needs to drive the plot forward and develop a character. A reverse outline identifies scenes that are lacking by revealing:
- Scenes with no conflict or decisions
- Plot threads that vanish halfway through
- Characters who stop driving the story
- Long stretches where nothing meaningfully changes
- Repetition disguised as development
Writers are often shocked by how different the book looks once it’s summarized objectively.
How to Create a Reverse Outline
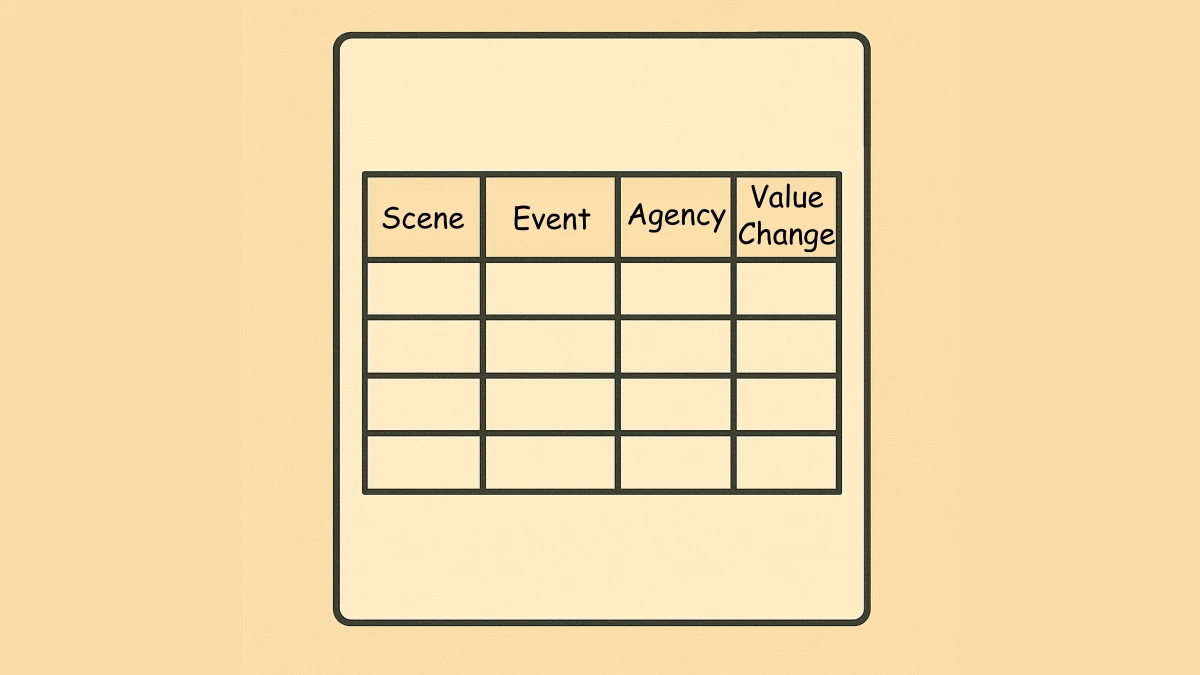
You don’t need special software. A simple spreadsheet works best because it allows you to sort and filter later. Create three columns: Scene Event, Protagonist Agency, and Value Change.
Each row in your spreadsheet represents one discrete scene. If a chapter has three scenes, it gets three rows.
Column 1: Scene Event (What Actually Happens?)
In this column, describe the literal action of the scene. Avoid summaries like "They talk about the plan." Be specific about the conflict.
Resist the urge to explain subtext or include the emotional intent you carry in your head. Stick strictly to observable events.
Bad:
They discuss the mission.
Better:
Anna explains the plan to break into the archive. Marcus objects, citing the danger. Anna overrides him and proceeds anyway.
Column 2: Protagonist Agency (Who Drives It?)
In this column, write down the name of the character who makes the key decision or takes the action that drives the scene forward.
If the character is just observing events, write "None" or "Passive."
Column 3: Value Change (What is Different?)
For every scene, identify what is different at the end compared to the beginning. This is often called the "value change." It could be:
- New information gained
- A decision made
- A relationship altered (e.g., Trust to Suspicion)
- Stakes raised or lowered
If the answer is “nothing,” don’t soften it. Write "No change." That honesty is the entire point of the exercise, and the outline only works if you commit to improve. Two characters might have a deep philosophical conversation that you enjoyed writing, but if neither is better or worse for it, nothing changed.
What a Reverse Outline Will Show You Immediately
Once you’ve completed the outline, patterns jump out fast. You won't need to hunt for problems; they'll be staring at you from the spreadsheet.
1. Scenes Without Conflict
You’ll spot scenes where everyone agrees, information is merely repeated, or characters react but don’t act. These scenes aren't always useless, sometimes you need a breather, but too many in a row will drain momentum and bore the reader. Read our article on Crafting Tension in Fiction for tips on how to fix them.
2. Dropped or Abandoned Plot Threads
That mysterious clue in Chapter 4? The secondary antagonist who disappears in Chapter 12? The promise set up in the opening that's never paid off?
3. Passive Protagonist Stretches
Scan your "Who drives the action?" column. If you see page after page where other characters are making decisions while your protagonist observes or follows, you’ve found a structural issue. Your hero has become a passenger in their own story.
4. A Sagging Middle
Writers often feel the middle is weak but can’t say why. The reverse outline shows exactly where the stakes plateau, where goals stop evolving, or where scenes repeat the same narrative function. This turns a vague feeling of "it's boring" into a fixable mechanical problem. For further reading check out our article on How to Fix Your Novel's Saggy Middle
What the Reverse Outline Doesn't Do
It’s important to set expectations. A reverse outline won’t fix your prose, solve thematic depth, or replace developmental feedback.
What it does do is give you a clear map of the story you actually wrote, which is a prerequisite for fixing anything else. You can’t revise what you can’t see.
How to Use the Reverse Outline for Revisions
Once the outline exists, revision becomes strategic instead of overwhelming. You can now act like an architect rather than a panicked writer.
- Cut or combine: Merge three scenes that accomplish the same goal into one punchy scene.
- Reinforce threads: Weave that dropped subplot back into the middle chapters.
- Add turning points: Insert a new complication where the outline shows the momentum dying.
- Clarify agency: Rewrite scenes so your protagonist makes the choice, rather than having the choice made for them.
Many writers discover they don’t need to rewrite the whole book, just a few key pressure points. We've written a separate article on knowing what to cut, which might be helpful once your outline is complete.
When Writers Get Stuck Using This Tool
The most common mistake is softening the truth. Writers add justification to their outline notes, like:
This scene seems slow, but it sets up the emotional payoff for the finale.
That may be true, but if nothing happens on the page right now, the outline should say so. The reverse outline isn’t a defense of the draft. It’s a diagnostic. If you lie to the spreadsheet, you're only hiding the cracks in the foundation from yourself. And besides, the finale payoff doesn't matter if readers don't make it that far.
Why This Works So Well Paired With External Critique
A reverse outline shows what is happening. Good critique explains why it’s working or not. Together, they’re powerful.
Many writers who feel overwhelmed by feedback struggle because they don’t have a structural map to anchor that feedback to. Creating a reverse outline first makes revision notes clearer, less emotional, and far more actionable.
Inkshift analyzes your manuscript to give you a detailed critique of your structure, pacing, and prose before you even start your reverse outline, saving you hours of guesswork and providing that crucial "outside perspective" instantly. It's free to try on your first 10,000 words.
Conclusion
The reverse outline forces you to let go of intention and confront execution. That can sting. But it’s the first step to improving. Once you see the story as it exists on the page, revisions stop being guesswork and starts being design.